Building an Analysis Solution
Before you can analyze your data, you must build an analysis solution in the Analysis Builder window.
To construct your analysis solution, you can choose from a set of predefined actions for object detection, classification and export. By testing them on an open project, you can configure actions to meet your needs. With the Analysis Builder, you assemble and configure these actions all together to form a solution, which you can then run or save to file.
The Analysis Builder Window
Image analysis solutions are built in the Analysis Builder Window. To open it, go to either View > Windows > Analysis Builder or Analysis > Analysis Builder from the main menu. You can use View > Analysis Builder View to select preset layouts.
When the Analysis Builder window opens, ensure that the name of the desired action library is displayed in the title bar of the Analysis Builder window.
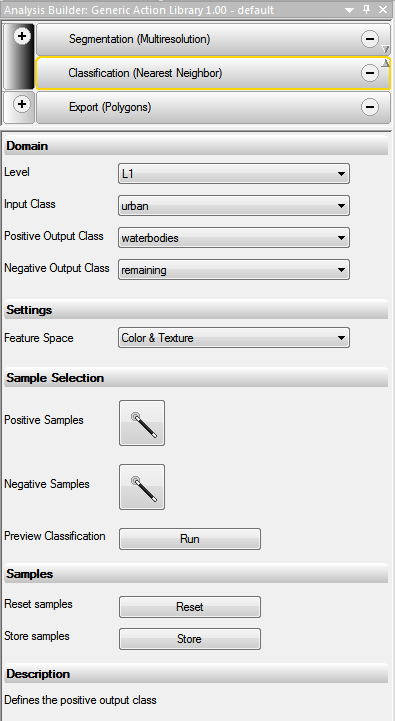
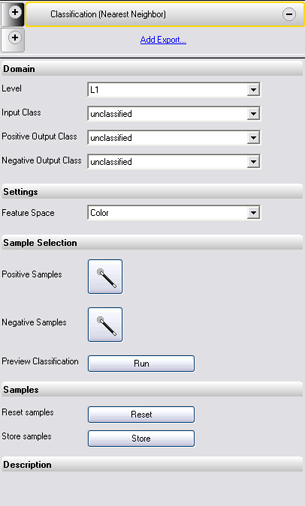
The Analysis Builder window consists of two panes. In the upper pane, you assemble actions to build solutions; in the lower properties pane you can configure them by customizing specific settings. Depending on the selected action, the lower properties pane shows which associated settings to define. The Description area displays information to assist you with the configuration.
Opening and Closing Action Libraries
To open an existing action library, go to Library > Open Action Library in the main menu. The name of the loaded action library is displayed in the title bar of the Analysis Builder window. The action groups of the library are loaded in the upper pane of the Analysis Builder window.
If you open an action library after opening a project, all rule set data will be deleted. A warning message will display. To restore the rule set data, close the project without saving changes and then reopen it. If you are using a solution built with a older action library, browse to that folder and open the library before opening your solution.
You can close the current action library and open another to get access to another collection of analysis actions. To close the currently open action library, choose Library > Close Action Library from the main menu. The action groups in the upper pane of the Analysis Builder window disappear.
When closing an action library with an assembled solution, the solution is removed from the upper pane of the Analysis Builder window. If it is not saved, it must be reassembled.
Assembling a Solution from Actions in the Analysis Builder
In the Analysis Builder window, you assemble a solution from actions and configure them in order to analyze your data. If not already visible, open the Analysis Builder window.
- To add an action, click the button with a plus sign on the sub-section header or, in an empty section click Add New. The Add Action dialog box opens
- Select an action from the Add Action dialog box and click OK. The new action is added to the solution. According to the type of the action, it is sorted in the corresponding group. The order of the actions is defined by the system and cannot be changed
- To remove an action from your solution, click the button with a minus sign on the right of the action bar
- Icons inform you about the state of each action:
- A red error triangle indicates that you must specify this action before it can be processed or another action must be processed previously. The green tickmark indicates that the action has been processed successfully.
Selecting an Action
To select an action for the analysis solution of your data, click on a plus sign in an Action Definition button in the Analysis Builder window. The Add Action dialog box opens.

The filter is set for the action subset you selected. You can select a different filter or display all available actions. The Found area displays only those actions that satisfy the filter setting criteria. Depending on the action library, each action is classified with a token for its subsection, e.g. <A> for segmentation and classifications or <B> for export actions.
To search for a specific action, enter the name or a part of the name in the Find Text box. The Found area displays only those actions that contain the characters you entered. Select the desired action and confirm with OK. The new action is displayed as a bar in the Analysis Builder window. You must now set the properties of the action:
- Go to the Analysis Builder window
- In the upper sequencing pane, select the action you want to customize
- Configure the action in the lower properties pane by customizing various settings.
Some actions can be selected only once. If such an action is already part of the analysis, it does not appear in the Add Action dialog box.
Settings
For each solution you must define specific settings. These settings associate your image data with the appropriate actions.
Viewing a Subset for Configuration
When configuring actions that are intended to process two-dimensional scene subsets or tiles only, you can open a subset of the project to use for configuration.
Go to the right-hand pane of the Workspace window that lists workspace projects, right-click a project and choose Open Subset, to open the Subset Selection Dialog box. Click in the image and drag to select a subset area. Alternatively, you may enter the subset coordinates. Confirm with OK.
The subset displays in the map view. This subset is not saved with the project and does not modify the project. After closing the map view of the subset, the subset is lost. However, you can save the subset as a separate project.
Saving and Loading Analysis Solutions
- You can save analysis settings in the Analysis Builder as solution files (extension .dax) and load them again.
-
- Alternatively, you can encrypt the solution by selecting Save Solution Read-Only on the Architect toolbar or Library > Save Solution Read-Only from the main menu.
To load an already existing solution with all the analysis settings from a solution file (extension .dax) to the Analysis Builder window, go to Library > Load Solution on the main menu. To use a solution that was built with another action library, open the action library before opening your solution. The solution is displayed in the Analysis Builder window.
(When you open a solution file (extension .dax), the actions are compared with those of the current action library. If the current action library contains an action with the same name as the solution file, the action in the current Action Library is loaded to the Analysis Builder window. This does not apply when using a solution file for automated image analysis.)
If you want to change a solution built with an older eCognition action library, make sure that the corresponding action library is open before loading the solution.
Testing and Improving Solutions
- Testing and improvement cycles might take some time. Here are some tips to help you to improve the results:
- Use the Preview that some actions provide to instantly display the results of a certain setting in the map view.
- To execute all assembled actions, click the Run Solution button on the Architect toolbar. Alternatively, choose Analysis > Run Solution from the main menu
- To execute all actions up to a certain step, select an action and click the Run Solution Until Selected Action button on the Architect toolbar. Alternatively, choose Analysis > Run Solution Until Selected Action from the main menu. All actions above and including the selected action will be executed.
- To improve the test processing time, you can test the actions on a subset of your project data.
To test and improve analysis:
- For faster testing use the Run Selected Action button on the Architect toolbar. Alternatively, you can remove already tested actions; delete them from the Analysis Builder window and add them later again. You can also save the actions and the settings as solution to a .dax file.
- When removing single actions you must make sure that the analysis job remains complete. For instance, you must first segment a certain class before you can classify the objects.
- To execute a configured solution not locally but on the eCognition Server, select a project in the workspace window. Click the Run Solution on eCognition Server button on the Architect toolbar. This option is needed if the solution contains actions with workspace automation algorithms.
Importing Action Definitions
To get access to new, customized or special actions, you have to load action definitions, which are simply unconfigured actions. If not yet available in the Add Actions dialog box, you can load additional action definitions from a file to an action library. This can be used to update action libraries with externally defined action definitions.
Action definitions can be created with eCognition Developer. Alternatively, Trimble offers consulting services to improve your analysis solutions. You can order special task actions for your individual image analysis needs.
To use an additional action definition you have to import it. Beside the .xml file describing the action definition, you need a rule set file (.dcp file) providing a rule set that is related to a specific part of the solution. The rule set has to include a parameter set providing variables to be adjusted by the user of the action library.
- Copy the action definition files to the system folder of your installation.
- Choose Library > Import Action on the main menu. Select an .xml file to load.
- Now the new unconfigured action can be selected in the Add Actions dialog box.
Saving Configured Actions with a Project
To facilitate the development of ruleware, you can save your configured action with single projects and come back to them later. A saved project includes all actions and their configurations, which are displayed in the Analysis Builder window in the moment the project was saved.
Configured actions only can be restored properly if the action library is open that was open when saving. This is because the action library provides corresponding action definitions.
